How to make an easy tutu and hair bows~updated!

Things you will need:

Ribbon
Large Salon Clip
Floss
Glue Gun
Lighter


1. Get your ribbon. Your ribbon length will depend on the size of your bows. In this "tutorial", I am making some toddler bows for my goddaughter and am using 22 inches. The bow will end up being 3.5 inches across. For a 4 inch bow, I use 24 inches, 5 inch bow, 26 inches.

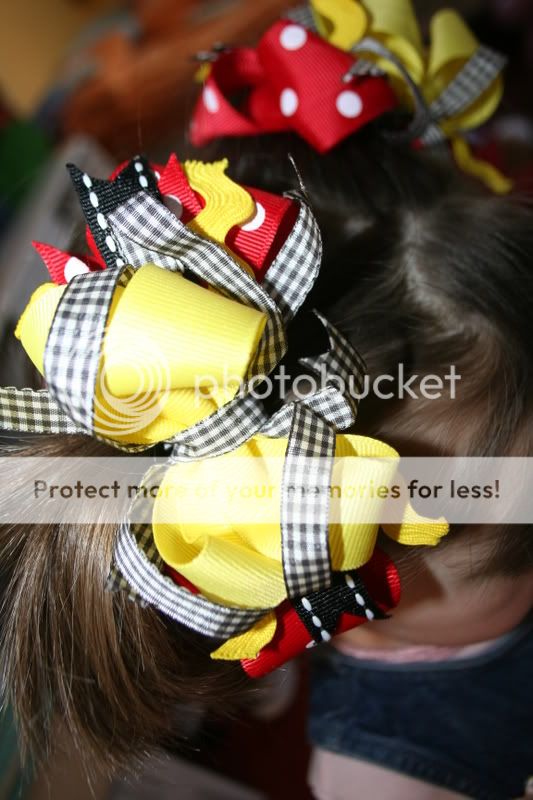
In this example, I am making some double layered Minnie bows. ;)

100_1852.jpg


2. Fold your ribbon in half and mark the half.

100_1853.jpg


Since the back of my bows are black, you won't be able to see my half mark very well.


3. Next, you're going to take the top of your ribbon and fold it inward on your half mark.

100_1854.jpg


You're going to do the same with the bottom. Eventually, it will look like a figure 8.

100_1855.jpg


4. Next, you're going to take your "top loop" and bring it down to the middle, like this:

100_1856.jpg


Then, you do the same with the bottom, until it looks like this:

100_1858.jpg


This will be the back of your bow!

5. Slide the salon clip over your bow. This makes it easier to tie.

Back of bow:

100_1859.jpg


Front of bow:

100_1860.jpg


6. Take your floss:

100_1861.jpg


Wrap it around the middle of your bow twice, with the ends being in the back of the bow.

Front:

100_1862.jpg


Back:

100_1863.jpg


7. Tie your bow tightly in the back, to look like this:

100_1864.jpg


8. Flip it around, remove the salon clip, fluff it up a bit and it should look like this:

100_1865.jpg


9. Next, you create your knot and hot glue it to the middle.

10. I attach alligator clips to my toddler bows:

100_1866.jpg


HTH everyone!

So follow Linda's awesome instructions.
DSC02909.jpg

The bottom layer of the bow is made out of 26 inches of the 1 and 1/2 inch ribbon that was used on the waist.

DSC02910.jpg

I then did 22 inches of the black ribbon with the pink dot ribbon on top.

DSC02911.jpg

The center strip in 6 inches the two side pieces are 5 inches. I cut the bottoms after they are on the bow as they may adjust some.

DSC02913.jpg

Place the strips on the 26 inch bows and then place the 22 inch bows on top.

DSC02924.jpg

Finished bows.

DSC02918.jpg

One bow on a 4 year old.
 
subscribing, now I know what to do for my bow addicted friend and her one year old!
 
O.k. This is going to sound crazy. But could someone PLEASE tell me where I can get the Large Salon clips with the hole in them. I have looked at several stores and all I can find is closed top ones. I have been using a large paper clip to do the bows because I could'nt find the clips but I can only do little bows and want to do bigger ones. And OP thank you so much for posting this thread:thumbsup2 . My girls love the bows.
 
O.k. This is going to sound crazy. But could someone PLEASE tell me where I can get the Large Salon clips with the hole in them. I have looked at several stores and all I can find is closed top ones. I have been using a large paper clip to do the bows because I could'nt find the clips but I can only do little bows and want to do bigger ones. And OP thank you so much for posting this thread:thumbsup2 . My girls love the bows.

I got them at Sally's Beauty supply along with the alligator clips for the back.

They come in a 6 pack but you only need one. Let me know if you want me to pop one in the mail for you. :thumbsup2
 
Subbing--

Obsessed, your bows are so PERFECT! It's so hard to find a bow maker that makes bows even and symmetrical. Anyone can fold a bow together, but yours are SO PERFECT and even! I love them!
 
O.k. This is going to sound crazy. But could someone PLEASE tell me where I can get the Large Salon clips with the hole in them. I have looked at several stores and all I can find is closed top ones. I have been using a large paper clip to do the bows because I could'nt find the clips but I can only do little bows and want to do bigger ones. And OP thank you so much for posting this thread:thumbsup2 . My girls love the bows.

I also got mine at Sally's Beauty Supply Store. Mine came in a 4 pack for around $3.

Subbing--

Obsessed, your bows are so PERFECT! It's so hard to find a bow maker that makes bows even and symmetrical. Anyone can fold a bow together, but yours are SO PERFECT and even! I love them!

Aww, thank you! I work really hard to make sure each bow is even and straight. That's the reason I eventually made my own! Everytime I would buy bows, they weren't even and it drove me CRAZY!

It also depends on the quality of ribbon you use. I use grosgrain, but a silky ribbon doesn't hold it's shape very well.

I also use:

100_1881.jpg


I spray it on and dry it with a blow dryer. It helps the bows keep their shape!
 
Thank you for telling me about the clips. I had been at sally's but they had no idea what I was talking about. After you told me they had them I went on the website and found them. I called the store and gave them the Item # and they had them after all:rolleyes: .
 
I know many of you asked, so here's the double layered Cinderella bow I made for a customer this morning.

Here are all the "parts" to the bow.

100_1886.jpg


The left bow is the base bow and I started with 24 inches of ribbon. The right bow is the top bow and I folded it with 20 inches of ribbon.

First, I started with the base bow:

100_1890.jpg


I then add the horizontal ribbon, which I have V-cut, but not heat sealed yet.

100_1891.jpg


If you notice, I have marked the middle of the horizontal strip. Again, this is to insure the bow is even, symmetrical and straight in appearance.

I then add my double loops.

100_1892.jpg


Next, I add my top bow:

100_1893.jpg


In the final step, I add my knot (which I will post directions for later). I also "trim up" my horizontal piece, which is the reason I didn't heat seal it to begin with.

This is the final product:

Cindybows.jpg
 
Here are the instructions on how to tie the middle knot for your bows.

You begin by taking your ribbon and making the "breast cancer awareness" fold, like this:

100_1887.jpg


I then take the right side and fold it in:

100_1888.jpg


Pull tight and VOILA!

100_1889.jpg
 
These have got to be the clearest instructions that I have ever seen! Thanks SO MUCH! I seriously think I can do this now!

Did I miss the instructions for the double loop portion somehow? Or did you do that the same way as the other layers?

Thanks again!
 
Love this thread!!! Thanks :) Did I miss the instructions for the double loop? Are they here somewhere?
 
Thank you!! Thank you!!! Thank you!!!

I made my first tutu this morning. What fun and how easy!! My daughter just turned 2 so I used ribbon for the waist. She looks so cute and kept saying, "I'm a fairy Princess!" It was priceless!!!

I have a question about the bows. How do you "heat seal" the ends? I have never done this and I would hate to go to all of the trouble to make the bow only to torch it! LOL!:firefight

Oh I am glad she liked her tutu!

For the ribbon you just hold it a little above a flame. I light a candle when I do bows. You will see it burn the loose pieces. If you hold it to close you can get a black mark, but just trim that off and try again.
 
These have got to be the clearest instructions that I have ever seen! Thanks SO MUCH! I seriously think I can do this now!

Did I miss the instructions for the double loop portion somehow? Or did you do that the same way as the other layers?

Thanks again!

Love this thread!!! Thanks :) Did I miss the instructions for the double loop? Are they here somewhere?

Nope, I just haven't gotten around to taking pictures of it yet! I will post some soon!

I have a question about the bows. How do you "heat seal" the ends? I have never done this and I would hate to go to all of the trouble to make the bow only to torch it! LOL!:firefight

I'm not sure if this question was directed at me, but I use a soldering iron. I found many times I would use a lighter or match and it would make the edges "wavy" or "uneven", especially in the v-cuts. With the soldering iron, I am able to seal the ends and not loose the straight edge of the cut of the ribbon. :)
 
Nope, I just haven't gotten around to taking pictures of it yet! I will post some soon!


I'm not sure if this question was directed at me, but I use a soldering iron. I found many times I would use a lighter or match and it would make the edges "wavy" or "uneven", especially in the v-cuts. With the soldering iron, I am able to seal the ends and not loose the straight edge of the cut of the ribbon. :)

Where do you get a soldering iron?
 
Linda! I just have to thank you!! I used to despise making bows until your instructions! I posted this on the disboutiquers thread already, but I was able to make these with them!
clothingcreation029.jpg

clothingcreation030.jpg

Thank you!
 
I am going to give these bows a try. I can never get mine fluffy. They always end up flat. Hopefully this technique will help me out some.
 
Where do you get a soldering iron?

I was wondering the same thing......

What is a smoldering iron?

Thank you for all of the tips! I can't wait to do bows now!!!!:bitelip:

A soldering iron is actually pronounced "sod-dering iron".

I got mine at Sears, but you can get it probably at Lowes, Home Depot, maybe even Wal-Mart.

Here's a link to what it looks like:

http://www.parts-express.com/pe/showdetl.cfm?partnumber=372-200

The end of the tip gets hot and, depending on the iron, the tips are generally thin pieces of metal. Because the tips are thin, this enables you to seal your grosgrain ribbon, but not loose the crisp edges.

Many people just use lighters or matches, but I ALWAYS found my sealed edges to be wavy. It drove me nuts! :)
 

GET A DISNEY VACATION QUOTE

Dreams Unlimited Travel is committed to providing you with the very best vacation planning experience possible. Our Vacation Planners are experts and will share their honest advice to help you have a magical vacation.

Let us help you with your next Disney Vacation!


facebook twitter
Top