***Disney Design Addict's Chit Chat,Designs and Pixie Dust! Everybody WELCOME!***

Status
Not open for further replies.
kilee said:
Those tyed-dyed shirts are incredible. They look too difficult for me-- but you could sell those on ebay they're that nice.


Good idea. I would buy some. ::yes::
 
We get all of our dyes from Pro Chemical Dye out of Mass. The are professional clothing dyes and the colors are very very vibrant. There are also some setting chemicals that you should use to help the colors stay vibrant.

I'd love to have instructions on how to do the Mickey head....
 
Disney1.jpg


This is ours from last year!
 
I would love to have detailed instructions on how to make the tye-dyed shirts. They are awsome! I've never done it before so I don't know where to start!

Ok, another stupid question. How do you do the transfers also. These are all cute ideas. I want to make a onsie for my then 15mth ds for his 1st trip. Thanks for your help!
 
I am so glad you all liked them. I will explain best I can. It really isn't that hard.

First you will need the dye. I got a kit at Michaels that came with the instructions, dye, squirt bottles, soda ash, gloves, and rubber bands. Get 100% cotton shirts. That is very important so that you get vibrant colors.

Take the shirt and draw a mickey head in pencil, on the shirt. I made a pattern on papper first and then traced along the edge. You will then "sew" the pattern. Use a needle and thread. I got a waxed thread at Michaels to make sure it didn't take up the dye. Sew a 1/4" - 1/2" basting stitch along the pencil line. A basting stitch is a very simple stitch that goes up & down through the fabric. Only go through the front of the shirt if that is where you want the mickey to be. If you want it on front and back. Do each side separtely. After stitching along the complete line, knot it, and pull it tight, so the fabric gathers in a bunch. Make sure the inside of the Mickey is poking outward. Pleat the rest of the fabric, so that you have a long snake like tube. The more careful you are with pleating the fabric along the length of the shirt, the better the final result. Go easy, and take your time. Wrap a rubber band around the threaded bunch. The tighter the tie, the more defined the outline of the mickey will be. Place remaining rubber bands in 1"-2" intervals along the rest of the shirt. It is a little hard to explain, but when you are done you will have a long snake. One end is the mickey on front of shirt and the other end it the back mickey. Through the middle is the rest of shirt (arms, neck etc.).

Then follow the instructions in the kit for preparing and dying shirts. The squirt bottles make it possible to get the specific color where you want it.

I will be glad to answer and questions if I didn't explain it well enough.
 
Greetings to Cujochurch from peoria....grew up in canton.....love to tie dye and did a bedspread with one of these kits years ago and the colors are still really bright. going to make these for sure .....thanks for posting your pic's :cool1:
 
Thanks so much Cujo....also with squirt bottles it's easier to get inbetween the folds so the color goes all the way through..

Can't wait to make some this weekend..... :cool1: :cool1: I'll post if I get the chance
 
Okay I'm a dud. I didn't "get" those instructions at all :confused3, :rotfl: but that's okay I'm a visual person and if I saw it I might be able to figure it out. Looks very cool anyway and I would love to try it on my kids shirts. Perhaps I'll re-read the instructions and try to do it for some out of school summer time crafts with the kids.

See I knew it ...I just re-read the instructions and it's becoming clearer already :banana:
 
VERY COOL Shirts Everyone!!!!!!!

Thanks for the tye-dye idea and directions. I already bought the guys shirts (each different) for our trip and have been looking for ones for the girls but think everyone might be getting matching ones too. ;)
 
Ok I'm going to try to post a picture of my family in one of the T-shirts that I made for our last trip.
showphoto.php
They are kind of hard to see in the picture but they have mickey and minnie in the center with Brooks on one side of them and Raymond on the other and family vacation underneath. I made 2 others shirts if this posts all right I'll try to post the others.
 
I'm going to try to post the picture although the link in larger. Here goes nothing.
63925family2-thumb.jpg
 
cujochurch said:
I am so glad you all liked them. I will explain best I can. It really isn't that hard.

First you will need the dye. I got a kit at Michaels that came with the instructions, dye, squirt bottles, soda ash, gloves, and rubber bands. Get 100% cotton shirts. That is very important so that you get vibrant colors.

Take the shirt and draw a mickey head in pencil, on the shirt. I made a pattern on papper first and then traced along the edge. You will then "sew" the pattern. Use a needle and thread. I got a waxed thread at Michaels to make sure it didn't take up the dye. Sew a 1/4" - 1/2" basting stitch along the pencil line. A basting stitch is a very simple stitch that goes up & down through the fabric. Only go through the front of the shirt if that is where you want the mickey to be. If you want it on front and back. Do each side separtely. After stitching along the complete line, knot it, and pull it tight, so the fabric gathers in a bunch. Make sure the inside of the Mickey is poking outward. Pleat the rest of the fabric, so that you have a long snake like tube. The more careful you are with pleating the fabric along the length of the shirt, the better the final result. Go easy, and take your time. Wrap a rubber band around the threaded bunch. The tighter the tie, the more defined the outline of the mickey will be. Place remaining rubber bands in 1"-2" intervals along the rest of the shirt. It is a little hard to explain, but when you are done you will have a long snake. One end is the mickey on front of shirt and the other end it the back mickey. Through the middle is the rest of shirt (arms, neck etc.).

Then follow the instructions in the kit for preparing and dying shirts. The squirt bottles make it possible to get the specific color where you want it.

I will be glad to answer and questions if I didn't explain it well enough.


Do you think you could take a picture of what the shirt should look like when it's all tied up (before it's dyed) so we can see it?? I don't know if it's possible top show us what you mean, but a visual might help. I know it's alot to ask, but I know I'd really appreciate it. Those shirts are really beautiful! Thanks for sharing your pic!
 
I love those tie dye shirts...VERY creative and what a good job you did making those! I think I know what my project will be for our next Disney trip. ;) :)

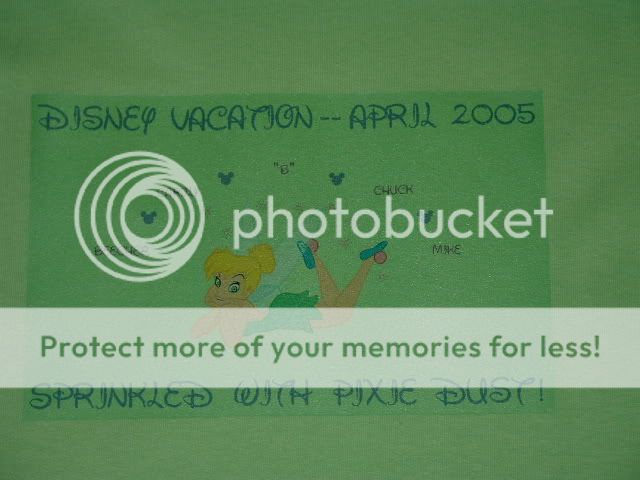
This is what was on our shirts when we went last month. I used different colored shirts for eveyone and color coordinated the transfer to go with each one. It doesn't show up well in the picture but I used silver fabric paint with glitter on the pixie dust around Tink to make it sparkle.

DSCF0003.jpg
 
This is our yellow family shirts. They have a picture on the front of all of us in our lime green shirts.
63925yellow_shirts-med.jpg


This is dh and I in our anniversary shirts. It has our original wedding picture with our wedding date and the phrase "happily ever after"
63925anniversaryshirts-med.jpg


They were fun to make and we got alot of attention everywhere we went. 'People would often say oh your party just went that way' or 'we know who your with"

The anniversary shirts were noticed by a lot of CMs and we got a message from Mickey and Minnie wishing us a happy anniversary.
 
I made these shirts for my dd's 16th birthday on May 10! Iron on transfers that I created in Microsoft word. Each shirt had a picture of the individuals favorite character. I had help with the wording from someone here on the DIS!!! Thank you SO MUCH!!! EVERYONE LOVED THEM!!! Me and DH also had one!

dd16's said, I asked for The World for my 16th birthday . . . AND GOT IT!! Walt Disney World - May 2005 Hers had Sweet Sixteen stamped on the back and everyone else's had Kayla's 16 Today! on the back.
:wizard:

f405d9f6.jpg
 
My3princes:

Loved the lime green T-shirts - think I'll try that too! Did you do the transfer from the computer?

Also loved the photo of the yellow T-shirts with the family pic on it. Very nice that all were in denim shorts too - really punches up the look!
 
Disneyfreakjackie-

Thanks for posting your shirt pictures!!! I was the one who helped with shirt ideas back in Feb and I was wondering how they came out and how DD16 enjoyed her b-day trip!!!!!

Wow...you guys have some creative shirt ideas!!! I love them! Keep um' coming!!! I have a tie-dye kit I haven't used yet either!!!! What to do?!!
 
Status
Not open for further replies.

GET A DISNEY VACATION QUOTE

Dreams Unlimited Travel is committed to providing you with the very best vacation planning experience possible. Our Vacation Planners are experts and will share their honest advice to help you have a magical vacation.

Let us help you with your next Disney Vacation!


Latest posts


facebook twitter
Top